ATAS Ultra
One Month Free for
AvaFutures Users

Reveal market depth, imbalances, and the activity of major players.

Registration

Explore a new level of market transparency
with professional order flow and volume analysis tools

Already have an account?

Offer valid until

June 4

Don’t miss your chance!
00 days
:
00 hours
:
00 minutes
:
00 seconds

  • Why ATAS?

  • 26+
    Connections

    Access stock, futures, and crypto exchanges worldwide.

  • 70+
    Volume Analysis Tools

    Including Footprint charts, Volume Profiles, and Heatmaps.

  • 14
    Timeframes

    Volume, Delta, Range, Renko, Reversal, and more.

  • 400+
    Footprint variations

    See what drives each price move inside every candle.

  • 240+
    Indicators

    Combine classic technical analysis with powerful volume analytic

Uncover True Market Insight

For a limited time, AvaFutures users get exclusive access to professional-grade market transparency powered by advanced order flow and volume analysis tools.

Order Flow Visualization

Order Flow Visualization

Gain a deeper understanding of market behavior with professional-grade order flow tools.
Smart Tape delivers a condensed Time & Sales view that highlights aggressive trades, imbalances, and key order flow metrics.
Bid/Ask Tape uncovers spread volume distribution and real-time trade dynamics.
All Prices tracks horizontal volume by price, helping you pinpoint critical trading zones and market reactions.

Liquidity Analysis Under
the Microscope

Liquidity Analysis Under
the Microscope

Visualize liquidity in real time with Smart DOM, DOM Power, Heatmap, Volume Profile, and MBO DOM.
Analyze limit orders, identify support and resistance levels, and spot buyer-seller balances or market depth all at a glance.

Advanced Indicators

Advanced Indicators

ATAS provides over 240 indicators for both volume and classic technical analysis.
Use tools like Cluster Search, Cluster Statistic, Big Trades, Depth of Market, Delta, CVD, CVD Pro, and Stacked Imbalance.
Customize every chart and combine multiple indicators to gain a precise view of market activity.

User-friendly Order
Management Interface

User-friendly Order
Management Interface

Take full control of your trades directly from charts, the DOM, or the trading panel.
Execute orders instantly, manage risk with flexible settings, and trade faster with one-click execution and fully customizable shortcuts.
How it works

How to Claim

Your 30-Day Free

Ultra License

1. Register ATAS account

2. Download and install: ATAS for Windows or ATAS X (Beta) for Windows & macOS

3. Launch the software using the login and password received by email after registration

4. Connect your AvaFutures account through MetaTrader 5. If you don’t have an account, click the button below to sign up

Ready to Start?

Activate your free ATAS x AvaFutures Ultra license today and experience a new level of market insight and trading precision.

*Offer not applicable to users with an active ATAS license

FAQ

  • Only verified AvaFutures users without an ATAS account.

  • From May 4 to June 4, 2026. Licenses issued during this period are valid for 30 days.

  • More detailed instructions for ATAS installation can be found in the Knowledge Base.

  • Connection is made through MetaTrader 5. Detailed instructions are available in the Knowledge Base.

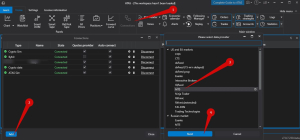
    To connect an MT5 account to ATAS, open Connections – Add – MT5 – Next.

    Next, windows for signing an agreement will open:

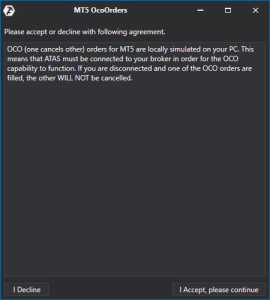
    OCO (One Cancels Other) orders for connecting MT5 are simulated locally on your computer. This means that the software must be connected to your broker for OCO orders to work correctly. If you get disconnected and one of the OCO orders is executed, the other orders in the group WILL NOT BE canceled! If you are okay with this, click “I Accept, Please continue”.

    Setting up the connection in ATAS

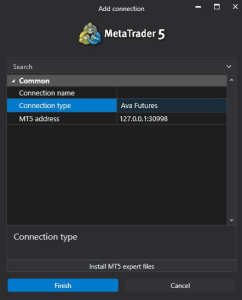
    1. Connection type – select your broker.
    2. MT5 address – default local IP address.

    After configuring the connection, it will appear as a separate line in the list of connections.

    You can read about the settings of this window at the following link: Connection Settings Window.

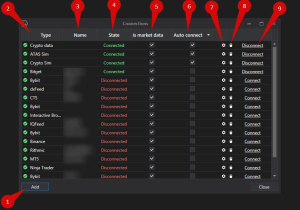
    1. Add – add a new connection.
    2. Type – connection source.
    3. Name – connection name which you can set yourself.
    4. Status – connection status.
    5. Quote Provider – option to select a quote provider (this connection will be used as a quote provider).
    6. Auto-Connect – if you want the connection to automatically occur when the platform is launched, enable this option.
    7. Connection settings button.
    8. Remove connection from the list button.
    9. Connect/Disconnect – connect/disconnect the connector.